Showing posts with label Tutorial. Show all posts

Friday, July 30, 2010

Cheap wedding napkin rings

Making Wedding Napkin Rings image
How to Make Cheap Wedding Napkin Rings

Since I still have not gotten over the whole wedding theme, I've figured what would be a better way to conclude it than having a tutorial on how to make your very own wedding napkin rings

We will be using some very cheap and readily available materials and anyone can do as you wont be needing any special tools.
Making Wedding Napkin Rings image

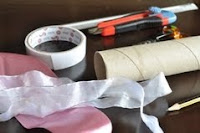
Things you will need:
- ruler
- scissors
- pencil for marking
- cutter
- double-sided tape
- wide satin ribbon
- pretty ribbons
- embellishment for decorations 
- cardboard tube (such as from kitchen towel)

Steps:
1.  Measure the cardboard tube using a ruler and mark it at several points using a pencil. 3-4cm is a good measurement for a napkin ring, but it is really up to your preference.
2. Use a  ruler to connect the points by drawing a straight line through them and slowly cut out the tube following the marked line with a sharp cutter knife.

Make your own wedding napkin rings imagebeading tutorial image
3. Cut the wide satin ribbon to a suitable length that will cover the whole of the cut-out tube. To make it easier, wrap the ribbon around the tube to measure. 
4. Line the outer tube with double-sided tape (do not peel off yet). Also line the inside of the tube but make sure to only put double-sided tape at the part where it will be covered by the ribbon. See pic.
*To make sure we have a nice and smooth napkin ring, make sure there are no trapped air bubble between the tape and the tube.

5. Place the ribbon on a flat surface. Peel off double-sided tape on the outer tube. Place tube on ribbon and gently roll it on the ribbon. 
*Satin ribbons are very delicate, to avoid it from being ruined,  never pull it sideways.
6. Peel off tape on the inside of the tube. Using your fingers, gently fold down the ribbons to the inside of the tube. 

7. Your basic napkin ring is ready. Now it's time to decorate it! You can use any fancy ribbons or embellishment for this purpose.
8. In this example, Ive combined two types of ribbons, by using a double sided tape, I taped them together and then onto the ring.

...and a simple yet elegant wedding napkin ring is created! 


Try it with various type of ribbons and designs, you can do all sorts of napkin rings for any occasion!

Thursday, June 24, 2010

How to make beaded napkin rings


Tutorial: How to make spiral beaded napkin rings - Beading for beginners

- I've been getting requests on how to make these napkin rings. So I've decided to start with probably the simplest design - the spiral napkin ring. These are fun to make since we'll be using a lot of beads. And it is up to your own imagination and creativity in deciding which type, and sizes of beads, and color or combination of colors to be used. I am using plastic beads this time to show how even the least expensive of beads can be made into a pretty stunning napkin ring.


Materials you will need:
Beads, Thick Wire (about 1.2mm gauge), Headpins (x2)

Tools:
Round-nose pliers, Flat-nose pliers, Tube shaped object


Step 1:
Wrap the thick wire around the tube several times to create a spiral. Remove the wire carefully without pulling it out of shape. 

Step 2: 
By using the round-nose pliers, bend one end of the wire into a small loop.

Step 3:
Insert or thread the beads on to the spiral wire. 

Step 4: 
Once all beads are threaded, make a similar loop at the end of the wire. 


 Step 5:  
(This is a tricky step and can be skipped. If this step is skipped, then just use the flat nose pliers to pinch the end loops down so they stay somewhat hidden from view.)
Time to dangle some beads on the end loops. To do this:
a) Slide a bead onto a headpin and with a round-nose pliers firmly grasping the wire just above the bead (this is called the neck), bend the wire down to a sharp angle 
b) Slide the headpin through one of the loops of the napkin ring
c) Use the round-nose pliers to grasp firmly at wire just above the bead and hold the tail wire with a flat-nose pliers and create create a loop by wrapping it around tip of the round-nose pliers then slowly wrap the wire around the neck of the headpin several times
d) Cut the rest of the tail wire

And voila! Your very own simple but yet elegant little napkin ring. I hope this tutorial has been useful to you. Please drop your comments, I would love to hear from you :)


Here's some pictures of my 3.5yo son making his napkin rings while I was preparing this tutorial. Yup, it's that easy to make :)


About me

Total Pageviews

Followers

Copyright © 2009-2011 Community is Designed by Bie Converted To Community Galleria by Cool Tricks N Tips

Privacy Policy|Napkin Rings