Crochet Stitch Markers
Tutorial: How to make crochet stitch markersSo since so many are interested in stitch markers I have decided to make a tutorial on how to make them, cause I know readers just simply love tutorials! They are really fun to make cause you don't need a lot of materials, and they are super easy to make too!
Here are the things that you will need to make
a simple beaded stitch marker (the one that we are making today will be an open
marker which means they are perfect for crocheting):
· Beads
·
Headpin
·
Lobster clasp
·
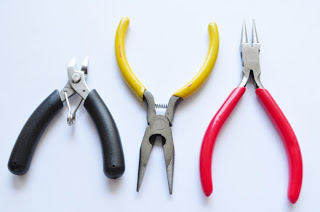
Round nose pliers
·
Chain nose pliers
·
Cutter
1. Slide your bead/beads through a headpin. Here I’m using 2 pearls and some spacers.
2. Holding the bead firmly in one hand, use the other hand to bend the headpin 90 degree downward, just above the last bed. Push your nail at spot where you will be making the bend with the hand holding the bead so that you get a neat bend.
3. Leave about 7-8mm of the pin and use your cutter to cut away the rest. The length of the headpin will determine the size of your loop. If you want a smaller/bigger loop, the length of the pin should be adjusted accordingly. 7-8mm should give you a medium size loop, the way I like it.
4: Time to make a loop.
Take your round nose pliers and grip the tip of the wire firmly, leaving just a tiny little bit of wire peeking through the barrels of your pliers.
5. Now rotate your wrist to twist the wire into a semi-loop.
6. Release the wire and rotate your wrist back to its start position, grip the wire one more time and rotate again till you get a complete loop.
(If you are having trouble with this, you can check out the many video tutorials available on Youtube, just search for Jewelry Making Simple Loop, you should find all the help you need).
7. Now we will need to open the loop to insert the lobster clasp. To do this, firmly hold the neck of the loop with your round-nose pliers.
8. Using your chain-nose pliers, grip the tail of the wire where the opening. With both hands gripping on the pliers firmly, gently twist one pliers up and the other down. Now there will be an opening in the loop.
(Again, if you struggle with this step, those Youtube videos should be able to help)
9. Insert the lobster clasp through the loop.
10. Using the same method above, close the loop.
So there you go! Easy peasy steps to making your own stitch marker and/or crochet markers.
If you do not wish to use lobster clasp and prefer to have a set of closed markers, you can use any suitable sized ring-type findings you can find at your craft store instead.
Have fun crafting!
Selina
Have fun crafting!
Selina


