Friday, October 5, 2012

How to make stitch and crochet markers

Crochet Stitch Markers

Tutorial: How to make crochet stitch markers


It seems like my recent post about stitch markers have generated quite a bit of views, I guess I’m not the only one that finds them adorable. In case you don't know which post I’m referring to, go here: http://charmingbeadz.blogspot.com/2012/10/stitch-markers-what-they-are-how-to-use.html.

So since so many are interested in stitch markers I have decided to make a tutorial on how to make them, cause I know readers just simply love tutorials! They are really fun to make cause you don't need a lot of materials, and they are super easy to make too!
Here are the things that you will need to make a simple beaded stitch marker (the one that we are making today will be an open marker which means they are perfect for crocheting):

·        Beads
·        Headpin
·        Lobster clasp
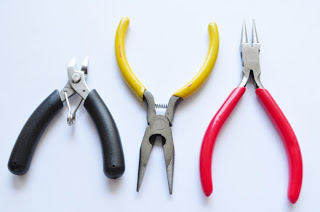
·        Round nose pliers
·        Chain nose pliers
·        Cutter

Materials needed to make stich markers

Tools needed to use to make stitch markers


1. Slide your bead/beads through a headpin.  Here I’m using 2 pearls and some spacers.


step nr 1.

2. Holding the bead firmly in one hand, use the other hand to bend the headpin 90 degree downward, just above the last bed. Push your nail at spot where you will be making the bend with the hand holding the bead so that you get a neat bend.


2

3. Leave about 7-8mm of the pin and use your cutter to cut away the rest. The length of the headpin will determine the size of your loop. If you want a smaller/bigger loop, the length of the pin should be adjusted accordingly. 7-8mm should give you a medium size loop, the way I like it.


3

4: Time to make a loop.
Take your round nose pliers and grip the tip of the wire firmly, leaving just a tiny little bit of wire peeking through the barrels of your pliers. 


4

5. Now rotate your wrist to twist the wire into a semi-loop.


6. Release the wire and rotate your wrist back to its start position, grip the wire one more time and rotate again till you get a complete loop.
(If you are having trouble with this, you can check out the many video tutorials available on Youtube, just search for Jewelry Making Simple Loop, you should find all the help you need).


5

7. Now we will need to open the loop to insert the lobster clasp. To do this, firmly hold the neck of the loop with your round-nose pliers.  


8. Using your chain-nose pliers, grip the tail of the wire where the opening. With both hands gripping on the pliers firmly, gently twist one pliers up and the other down. Now there will be an opening in the loop.
(Again, if you struggle with this step, those Youtube videos should be able to help)


9. Insert the lobster clasp through the loop.


7


10. Using the same method above, close the loop.


8

So there you go! Easy peasy steps to making your own stitch marker and/or crochet markers.
 
Stitch marker - final product

If you do not wish to use lobster clasp and prefer to have a set of closed markers, you can use any suitable sized ring-type findings you can find at your craft store instead. 

Have fun crafting!


Selina

Monday, October 1, 2012

Stitch Markers – Aren't They Fun


Stitch Markers – what they are, how to use them and why are they so much fun?!!


When I was younger I loved to try new things, fun and creative things (hmm maybe not much has changed). For instance, I tried sewing – I sewed little dresses and shawls for my Barbie doll; I tried patchworking – made a little quilt for my nephew when he was just a tiny little baby, I wonder if my sister-in-law still kept it; I also tried knitting and got one sweater out of it, it was pink with purple stripes and very comfortable (Im sure mom still kept it somewhere, I should try and look for it and post a picture)! I still find these things that I learned then interesting and wish one day I would be able to pick them up again.
I think all knitters would agree with me that one of the fun things about knitting is having all these cool looking supplies, knitting tools and notions to play with. From the thousands of beautiful and colourful balls of yarns to various types and sizes of needles, from fancy row counters to cute little markers!

When I was learning how to knit, collecting these tools and supplies was the best part about knitting. Every other day when I went for my lesson I would bring home something new, usually yarns cause they were so irresistibly adorable (which I end up never using). Other times needles, cause I absolutely had to have all the sizes available. Im sure all you knitters out there can relate!

One thing I didn’t find back then were stitch markers like the ones we have today. Those days stitch markers we had were these colorful little plastic ones, they were cute back then but nothing compared to what’s available today.

So what are stitch markers?
Stitch markers are usually little round rings (or you can also find fancy square ones these days) that are slipped onto a needle to mark a spot in a row. Stitch markers are very crucial especially to free-crocheting and are often used to count rounds. They are also used to mark certain number of stitches and where blocks of different stitches to be placed. There are generally 2 types of stitch markers, closed stitch markers and open ones. When crocheting, only open stitch-markers are used.

How to use stitch markers?
For close stitch-markers all you need to do is slip the ring onto your needle to mark a spot (for whatever reason) in a row and continue knitting as normal. When you reach the marker again, simply slip it from one needle to another and continue again. For crocheting however, you will need open markers. Instead of slipping them onto your needle, you place them on your stitches. They can be added, adjusted and removed anytime.

So why are they so much fun?
Because they are so cute!! These days, stitch markers are like little accessories for your stitches, they come in all sorts of designs and made from all sorts of materials. Some of course prefer plain plastic rings as they are light and practical. I simple love the colorful beaded ones (not that I use them but they are still very pretty to look at) but that is probably because I love little pretty beads.

I started making them for fun a couple of years back and I even sold a few here and there. There are too many to choose from and you can easily get them from the internet. These are some of the ones I've made. They are just like your jewelry except you don’t get to put them on you! 
Stich Marker


Stich marker example 2


3


About me

Total Pageviews

Followers

Copyright © 2009-2011 Community is Designed by Bie Converted To Community Galleria by Cool Tricks N Tips

Privacy Policy|Napkin Rings